Quantcast
Channel: Thin Client, Mini PC and All in One by Thinvent
Viewing all 97 articles
Browse latest View live

Remote Desktop Tool

$
0
0

There are many remote desktop tools available in the market. They made it possible for the IT support team and system administrators to access the connected thin clients with the main server or vice-versa. Remote Desktop tools are available on both Linux and Windows platforms. Some of the popular remote desktop tools used are:

Remmina

Remmina is a remote desktop connection client able to display and control a remote desktop session. It can connect to a VNC platform as well as windows terminal servers. It supports the Remote Desktop Protocol (RDP), VNC, NX, XDMCP, SPICE and, SSH protocols. Remmina is available for the Linux platforms only.

Installation

We can install Reminna in Ubuntu by using the following command.

sudo apt-add-repository ppa:remmina-ppa-team/remmina-next
sudo apt update
sudo apt install remmina remmina-plugin-rdp remmina-plugin-secret

Once the installation is done, you can open the Remmina from the Ubuntu menu.

AnyDesk

AnyDesk is a free and simple-to-use remote desktop solution, which helps you access documents and files on any device across several locations. While the program has been immensely popular among developers, it continues to win more hearts with a wide range of features, such as file sharing, customized user interface, online collaboration, and access control.

Installation

AnyDesk is available on both Linux and Windows platforms. In Windows, you can install it by running the AnyDesk.exe from the following link.

https://anydesk.com/en/downloads/windows

In Ubuntu, you can download the .deb from the site below

https://anydesk.com/en/downloads/linux

After the downloading is done, you can run the deb package using the following command.
sudo dpkg -i

If you face any dependencies errors then run the following command.
sudo apt-get install -f

Once the installation is done you can open AnyDesk from both Ubuntu and Windows menu.

TeamViewer

Available in premium and free versions, TeamViewer is quite an impressive online collaboration tool used for virtual meetings and sharing presentations. It brings features like full-time access to remote computers and servers. the setup is incredibly easy and user friendly.

Installation

TeamViewer is available on both Linux and Windows platforms. In Windows, you can install the TeamViewer by simply running theTeamViewer_setup.exe from the site

https://www.teamviewer.com/en/download/windows/

In Ubuntu, you can download the deb package and install it by using the following command.

sudo dpkg -i

If you face dependencies errors then run the following command

sudo apt-get install -f

Once it is installed, you can run TeamViewer from the start menu by simply clicking on the TeamViewer icon

VNC

VNC is a screen sharing software that lets you connect to a remote computer anywhere in the world, watch its screen in real-time, and take control as though sitting in front of it.

Download and install the VNC server software in the system which you want to control.

Download and install the VNC client software in the system from where you want to control the remote system.

Installation

VNC is available on both the Linux and Windows platforms. In Windows, you can download and install the exe file from the following site.

https://www.realvnc.com/en/connect/download/viewer/windows/

In Ubuntu, you need to download the deb package from the site

https://www.realvnc.com/en/connect/download/viewer/linux/

and install it using the command

sudo dpkg -i

If you face dependencies issues, you need to run the following command

sudo apt-get install -f

Once it is done, you can open the VNC from the start menu of both Windows and Ubuntu.

The post Remote Desktop Tool appeared first on Thinvent Technologies.


Thin Client Setup

$
0
0

This article will help you to set up the Micro 4 and Neo R (Thinux).

NETWORK SETTINGS

By default, both Micro 4 and Neo R run the DHCP protocol to assign the IP address to the device but if you want to put a static IP address to the system, you can change it by the following steps:

  • Click on the network icon which is on the top right of the taskbar. You will see a drop-down menu once you click on the network icon. After this, you need to click on the edit connections section.
  • Navigate to the IPV4 tab. Click on the drop-down menu which shows automatic and select the manual option from it.
  • Click on the add button and mention the static IP address which you want to assign to the system. You can also assign the netmask and gateway here.
  • Click on save and windows. Click on the network icon again and click on the Wired connection option to apply your changes. You can also use a command to restart the network.

    sudo service network-manager restart

CONFIGURE REMMINA

Click on the following link to configure Remmina in your thin client.

https://www.thinvent.in/support/configure-rdp-preferences-in-micro-4-thin-client/

ENABLE KIOSK MODE

Follow the steps to enable the Kiosk mode in the Micro 4 and Neo R

  • Navigate to the Start menu of the Thinclient. Click on settings and then, click on the Enable Kiosk Mode option.
  • It will ask for the password to enable the Kiosk mode. Put Thinux as the password. Next, it will ask you to reboot the system. You need to click on yes.
  • Once the reboot is complete, you will see the RDP connection window. Click on Configure and click on the connection number 1 or any other number to make changes.
  • Now you will see the configuration window where you configure the server IP. In the Server address mention the IP address of the server to whom you want to connect.
  • If your network has a domain name then, mention in the Domain field.
  • Mention the username and password of the Windows/Linux user to whom you want to connect in the Username Password field.
  • If you want your thin client to automatically connect to the server whenever you power on the system, you need to check the Autoconnect option to yes, otherwise leave it to no.
  • Click on ok to Save your configuration. After that, you will return on the main RDP connection window and you will your configured server information in the window. Select the connection number and click on ok. After this, you will be connected to the remote server.

Click on the following link to see how to enable KIOSK mode in the thin clients:

https://www.youtube.com/watch?v=AuJSuDnkM2w

The post Thin Client Setup appeared first on Thinvent Technologies.

Linux Based Thinclients

$
0
0

Thinvent has a wide range of thin clients that run on the Linux based OS. Micro 4 and Neo R comes with the Thinux embedded system installed in it which is our in-house customized Linux based operating system. While Micro 3 and Micro 5 comes with the Ubuntu-based Linux operating system. We also provide Linux operating systems in Neo R according to the customer needs.

For more information click here

Micro 3

Micro 4

Micro 5

Micro 5 Mini PC

Neo R

The post Linux Based Thinclients appeared first on Thinvent Technologies.

Setup a CentOS armhfp VM on Ubuntu 18.04 Desktop

$
0
0

Not long ago, I got a chance to set up the CentOS armhfp virtual machine on my Ubuntu 18.04 desktop for one of my projects. Although I could have chosen another way to do my testing which involves flashing the ARM image on an SD card and booting it on the board, I preferred to work on the QEMU. The reason is that the testing of boards like Cubietruck or Raspberry Pi is time-consuming. If somehow we corrupt the image, we would be following the same procedures all over again like removing the SD card, reflashing with the correct OS image and, booting/testing the pkg/update/, changing the U-boot settings, etc.

QEMU is an open-source machine emulator or virtualizer which is capable to run operating systems of any architecture. To set up the QEMU environment in a base OS like Ubuntu or CentOS is pretty straightforward.


Prerequsites

Install the QEMU and other supporting packages to enable the QEMU in the Ubuntu 18.04 system.

sudo apt-get update
sudo apt-get install -y qemu-kvm qemu virt-manager virt-viewer libvirt-bin

You can also download QEMU from the offcial site. To download and build QEMU 5.0.0:

wget https://download.qemu.org/qemu-5.0.0.tar.xz
tar xvJf qemu-5.0.0.tar.xz
cd qemu-5.0.0
./configure
make

To download and build QEMU from git:

git clone https://git.qemu.org/git/qemu.git
cd qemu
git submodule init
git submodule update --recursive
./configure
make

Set up bridge networking in the system. A bridged network is a dedicated network card to a virtual machine that helps guest machines to connect outside the network, and this must be set up before creating a virtual machine using QEMU.

sudo apt-get install -y bridge-utils resolvconf

Edit interface file to create a bridge br1. You can also assign the static IP to your bridge.

sudo nano /etc/network/interfaces

# interfaces(5) file used by ifup(8) and ifdown(8)
auto lo
iface lo inet loopback

#Bridge Name #
auto br1

# Bridge Information #
iface br1 inet static
bridge_ports ens33
bridge_stp off
bridge_fd 9
# Bridge IP #
address 192.168.1.10
netmask 255.255.255.0
network 192.168.1.0
broadcast 192.168.1.255
gateway 192.168.1.1
dns-nameservers 192.168.1.1
dns-nameservers 8.8.8.8


Download the CentOS ARM image

Download or import the ARM image. Here we are using the CentOS ARM image. You can download it from the CentOS page or wget/curl it from the CEntOS FTP server. You can download the image directly from the link below.

Or you can wget the image from the command line.

wget http://centos.zero.com.ar/centos-altarch/7.8.2003/isos/armhfp/CentOS-Userland-7-armv7hl-generic-Minimal-2003-sda.raw.xz


Running the QEMU

QEMU would require Kernel and initramfs file for booting the image. You can extract these files by mounting the image using the kpartx and mount command.

Using kpartx:

sudo kpartx -av (path_of_your_image)

Running the above command will create the loop devices in your system. You can mount the particular loop device to mnt using the mount command and copy the required files from the image.

sudo mount /dev/mapper/loop21p2 /mnt/

Once you are done with your changes, you need to umount the mnt and delete the loops.

sudo umount /mnt/
sudo kpart -dv (path_of_the_image)

Using mount command:

Use parted command to get the start and end sector of the partitions in the image.

sudo parted (path_of_the_image)

Running the above command will open the parted utility. Type Unitand press enter. Enter the option b. Once it is done, type print and you will get the required information.

Use this information to mount the required partition to the mnt. Here I am mounting the first partition to the mnt.

sudo mount -o loop,offset=4194304 (image_path) /mnt/

Since we have extracted the required files from the image, you can now use the QEMU command to run the VM environment.

qemu-system-arm \
    -M cubieboard -m 2048 -cpu arm1176 -dtb sun4i-a10-cubieboard.dtb \
    -kernel vmlinuz-4.19.113-300.el7.armv7hl \
    -append "ro root=UUID=64e0ba9f-b645-4ce1-925d-e1a723a580fd rhgb quiet LANG=en_US.UTF-8" \
    -initrd initramfs-4.19.113-300.el7.armv7hl.img -nographic \
    -drive file=(Image_file_path),format=raw,if=none,id=d1 \
    -device ide-hd,drive=d1 -net user,hostfwd=tcp::10022-:22 -net nic

Here I have provided 2GB RAM to the VM and provided the other pieces of information which are required to boot the image like kernel, initrd etc.

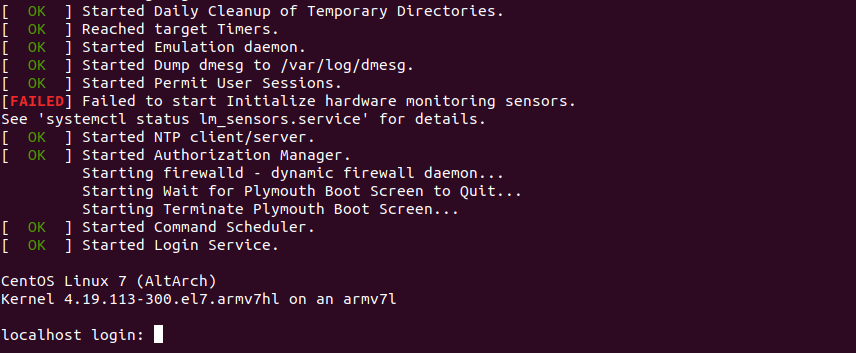
Once the image is successfully booted, you will get the login screen at your terminal.

By default, the size of the root file system partition is limited to 2 GB. The size of the partition can be increased by the following command.

[root@host ~]# /usr/bin/rootfs-expand

The post Setup a CentOS armhfp VM on Ubuntu 18.04 Desktop appeared first on Thinvent Technologies.

Step-by-Step Guide: How to do setup of Micro 4?

$
0
0

Getting Started

When you first turn on the Micro 4 thin client, you are greeted with the default desktop of the thin client. The desktop has the icons Home, Remmina, and Trash.


  1. Desktop Icons
  2. Clicking on the Home thin client’s home directory.

    Clicking on the Remmina will open the Remmmina GUI window where you can make $

    Clicking on the Trash icon will open the recycle bin.


  3. Using the taskbar

The Taskbar of the thin client is at the top of the screen. It allows you to locate and launch programs through Start and the Start menu, or view any program that is currently open. It also allows you to check the date and time.


Clicking on 1 will open the start menu. Once you click on this, you can navigate through the applications which are provided by the thin client.


Click on 9 to open the volume panel. From there you can increase or decrease volume.


Clicking on the 11th icon will give you the option to shut down the system.


Network Settings

You can access the network configuration window by two methods.
 

Method 1:

Start menu > All applications > Advanced Network Configuration.
 

Method 2:

By clicking on the 5th icon of the taskbar.
 

  1. Ethernet

By default, the thin client network settings are on the DHCP settings. However, if you want to change it to the static configuration, you can do it from it.
The network settings window will come up once you open the network settings from one of the two methods defined above.

                                      2.1

  • Click on the settings icon as shown in figure 2.1. It will open the editing window. Click on the IP4 Settings tab. Select the connection type from the list, whether you want to select the DHCP or Manual settings.
  •  

  • Once the Manual method is selected, you need to click on Add. Now you can enter the desired IP address which you want to assign to your thin client. (Figure 2.2 and 2.3)
  •  


  • Once you have entered the IP address, click on Save and close the network setting window.
  •  

  • To activate your settings, click on the network icon on the top right of the taskbar. Then, you need to click on the disconnect option and again click on the
     
    Wired connection option. This will activate the new IP settings which you have entered into your system.

  •  

    1. WiFi
  • Connect the WiFi dongle with your thin client.
  •  

  • Now, click on the Network Icon which is in the task bar. The moment you will click on it, you will see the available WIFI networks. Just click on the one of the WIFI networks which you want to get connected with, enter the WIFI password and you are connected to WiFi network.
  •  
     

    Configuring Printers

    There are two ways by which you can configure your printer locally with the thin client.
     

    Method 1: Configuring through the start menu


    • Connect the printer USB cable to the thin client and search for the printers in the start menu.

    •  

    • Clicking on Printer will open the printer configuration window

    • Click on Add to add the printer.
       

    • It will show the name of the printer which is successfully detected by the thin client. If your printer name still does not show up in the Select Device section, you need to check your printer USB cable. Select the printer and click on Forward. The system will now search for the printer drivers.

    •  

    • Once the driver is installed, the settings window will give an option to print a test page to check if the connected printer is configured correctly.

    •  

    • The printer setting window will show the printer configured by the user once the printing of the test page is done.

    •  

      Method 2: Configuring through the Web Browser


    • Open the Web browser and type localhost:631 in the address bar and press enter.

    •  

    • This will open the Cups utility page. Now, click on the Administration tab.

    •  

    • The Utility gives you three options, Add printers, Find New Printer and Manage Printer. If you want to manage a pre-installed printer, you need to click on the Manage Printer button. To add a new printer, click on Add Printer.
    • The system will ask for Username and password. Put root as the user name and thinux as password.
    • If your printer is connected with the thin client, it will show it’s name in the Add Printer configuration window. Select the printer which you want to add and click on Continue.
    • Next, it will ask you whether you want to share the printer or not. Check the button if you want to share the printer and click on continue.
    • Select the ppd file from the Model section according to your printer. You can also provide a ppd from the external driver or a directory. Click on Add Printer once all is done.
    • Set the default page settings and other settings. Click on Set Default Options once you are done.
    • Now your printer is configured successfully. You can click on Administration or Maintenance to explore the printer options. You can print a test change to the printer from the Maintenance > Test page.
    •  
       

      Managing RDP Preferences


      Thinvent has provided two ways by which you can access any operating system remotely from anywhere. These ways are:

      • Remmina.
      • Kiosk Mode.
      •  

        1. Remmina

        Remmina is a remote desktop client which is widely used in the Linux based operating systems. It supports the Remote Desktop Protocol which is used to connect with a remote system. You can access the Remmina application in the thin client via the main menu or just click on the Remmina icon which is on the taskbar. Once clicked, you will see the main Remmina dialog box where you can make your connection settings.


        Although you can connect to a remote system by just mentioning the I.P address of the remote system in the RDP section but, by doing this you won’t be able to explore the features of Remmina. So, it is always preferred to create a new connection with all those options enabled.

        To create a new connection click on the icon and Remote Desktop Preference window will get opened. By default, the protocol selected in the Protocol section is NX-NX Technology, you need to select the RDP -Remote Desktop Protocol there. Once you are done with it, your Remote Desktop Preference would be like the screenshot below. Each field of the window is described below.

      • Name

      • This is the name of the computer that you want or wish to connect to, this does not need to be the actual name that has been assigned to the host computer. You can choose any name that would best describe the computer and differentiate it from the others (if you plan on having multiple hosts).

      • Group

      • Leave it as it is , empty. There is no need for it for connecting to a remote system.

      • Protocol

      • Select the RDP – Remote Desktop Protocol.

      • Pre-command and Post-command

      • Remmina has ‘Pre’ and ‘Post’ command support to execute a script before it connects and after it disconnects, respectively. You can leave those fields blanks.

      • Server

      • Enter the IP address of the system to which you want to connect remotely. The IP address could be internal i.e if the system is connected with the local network or a public IP address.

      • Username and Password
      • Enter the username that you wish to log onto your host computer in the Username field. In the Password field, you need to enter the password of the user to whom you are going to connect.

      • Domain

      • If your networking has a domain name, then mention its name in this field. Otherwise, leave it blank.

      • Resolution

      • There are 3 options provided in the resolution field. If you choose Use initial window size, the RDP screen would be compact. This option is not recommended so it is better to choose the Use client resolution option. If you want to set a custom resolution then select Custom and select the appropriate resolution from the drop-down list.

      • Colour Depth

      • Select the appropriate colour depth via this option. This is an important selection, if you select the default option of 256 colours (8bpp) and your default background is Hi-Res then you will start to see some funky colours and it is generally unworkable. If you are on a slower connection or if you are connecting to an external machine outside of your network you may need to reduce the number of colours. By default, you can let it set on the predefined settings which is GFX AVC444(32bpp).

      • Share Folder

      • Use this option if you want to copy a file from your thin client to your remote pc or vice-versa. Once you select this box, it will give you an option which folder or path you want to share and the same folder or path will appear in your Windows machine.
        Once all these options are filled, your Remote Desktop Preference screen will look like this.


        Click on the Advanced tab to enable other features like sound during the RDP connection.

      • Quality

      • This option is related to the quality of the RDP connection. The list provides options like Poor, Medium, Good, Best. If you choose the Best option, your overall RDP connection quality will be good however, you may experience some lag in your connection. So, it is advised to have the Poor option selected in this field.

      • Sound

      • This option enables the sound over the RDP connection. You can choose from options like Local, Local-medium, Local-best etc. here.

      • Security

      • You can choose the level of security like NLA, TLS, RDP from this option otherwise leave this option on Negotiate.
        Now, scroll down the window and select options like share local printer etc. according to your needs.

        If you want to get connected to your created connection automatically once you open the Remmina, you need to check the Turn on “Auto Start” for this profile. option in the Autostart tab.

        Click on the Save button once you are done with the settings options. Once it is done, you will see a connection is connected with the name provided by you in the main Remmina window.

        You just need to double click on the connection which has been created and you will be connected to the host system whose access you want to have.
         

        2. Kiosk Mode

        Kiosk mode is a feature that only allows you to run one application and that is Remmina. Other features of the Thinux operating system like the GUI and other things get disabled and you will see the Remmina window only on your screen.

      • Click on the Enable Kiosk Mode icon in the Thinux menu to enable the Kiosk mode in your thin client.
      •  
        Note: Before accessing the Kiosk mode, you need to create the RDP connection in the Remmina first because one system enters into Kiosk mode, it doesn’t allow you to create new connections or make changes to the existing connection.

      • Once you click on the icon, a dialog box will appear asking you to enable the Kiosk mode are not. It gives you the option to enable the mode(yes), quit the mode in case you have accidentally clicked on the Kiosk mode icon and change password.
      • If you click on yes, the system will ask for the password to enable the Kiosk mode.
      • The system will go into the Kiosk mode if you enter the correct password, otherwise it will show that the password you entered is wrong.
      • Once you enter the Kiosk mode, you will see the only window which is the Remmina window and it will have the created RDP connection which you have created before enabling the kiosk mode.

      • &nbsp:

      • If you haven’t selected the auto connect option, the system will not auto connect to the remote system. If it is checked, then the system will automatically connect to the remote system once you enable the kiosk mode.
      • To disable the kiosk mode, click on the button on the Remmina window. It will open a dialog box where you would be asked to either shut down the system or configuration. Click on the configuration tab and it will ask for the kiosk mode password. Entering the password successfully will disable the Kiosk mode and it will take you back to the Thinux operating system GUI.

      •  

      • If you wish to enable the Kiosk mode forever then you can just shut down and the next time the system boots, it will automatically connect to the remote system.

      •  
         

        Change Kiosk Password

        You can change the default kiosk password by clicking on the Change Password.

      • The window will ask you for the current password, new password. To make changes it again asks you to confirm the new password which you have entered in the New password field. If any mismatch happens, like your entered current password and current password doesn’t match or your new and confirm password doesn’t match, the system will throw an error. If everything matches then a password update message will appear on the window.
      • Disconnect RDP From Server

        There are two methods by which you can disconnect the RDP connection from a server.

      • Method 1:

      • Click on the shutdown button which is in the start menu of the Windows. You will see the Disconnect option. Click on it and your RDP connection will be disconnected.

      • Method 2:

      • Remmina has the disconnect option. You just need to click on the option and the RDP will be disconnected.


        Factory Reset


        If the thin client is not functioning properly or some of the operating system features are not working, in such case you can try factory resetting the system. Doing a factory reset restores the system back to its original state when it was delivered to the customer.

        To perform the factory reset, go the main menu and search for the factory reset icon.

        Clicking on that icon will ask you to reboot the system. Click on yes. Once reboot is done, your system will be factory reseted.

        The post Step-by-Step Guide: How to do setup of Micro 4? appeared first on Thinvent Technologies.

    Making changes in Thinux

    $
    0
    0

    Our Neo and Micro range of products come pre-installed with our Thinux Embedded Linux operating system.

    Thinux is based on Ubuntu Linux. As of the writing of this article, it is based on Ubuntu 20.04.3 LTS. However, there are some significant changes between Ubuntu and Thinux. One is that we include drivers specific to our hardware, that are not be available in upstream repositories. We also include systemd services that protect the hardware from damage. This might seem strange to folks who are used to using PCs with a BIOS. Processors manufactured by Intel and AMD are usually pretty good at self preservation – they throttle their speeds and turn off some cores when they are close to overheating. In the worst case, they work with the BIOS to abruptly power off the computer rather than burn out. This level of protection is still not available with ARM processors. The uboot bootloader used with ARM systems does not stay in memory once it transfers control to Linux, and thus does not work in the background to protect hardware components from thermal or other damage.

    Which is why, when customers contact us to disable or replace Thinux on our ARM based products, we must inform them that this would void their hardware warranty. This policy is in line with what Android based mobile phone manufacturers have in place, when you contact them to unlock bootloaders. You must call or write to us in order to get the system root password, and we must mark your device as warranty void before giving you the password, if your device is ARM based.

    The primary change between Thinux and Ubuntu is that the Thinux root file system is mounted read-only. This means that you cannot use apt and other commands to make changes to the OS. If you have the root password, you can make changes to /etc and /var. Even when the user does not have the root password, processes that run with root privilege make changes to /etc and /var. These changes are actually stored not in the / partition, but in the /overlay partition. You can read more about the overlay filesystem on kernel.org.

    In order to make changed to /, you must first remount the / filesystem in read-write mode. Here are the commands that you need to issue on a terminal:

    su -
    (please enter the root password)
    umount -l /etc
    umount -l /var
    mount -o rw,remount /

    Now you can make changes to /. After your work is done, you can reboot the system to have the root filesystem back in rw mode.

    Let us say you no longer want to use the read-only root feature of Thinux. In order to permanently turn it off, you will need to make the following some changes to /etc/fstab. First, lazy umount /etc like we showed you in the previous code segment. Your typical /etc/fstab file will look like this:

    proc                 /proc       proc    defaults                                           0    0
    LABEL=thinux         /           ext4    defaults,ro,noatime                                0    1
    LABEL=data           /overlay    data    defaults,noatime                                   0    2
    mount_over           /etc        over    defaults,x-systemd.requires-mounts-for=/overlay    0    0
    mount_over           /var        over    defaults,x-systemd.requires-mounts-for=/overlay    0    0
    mount_over           /home       over    defaults,x-systemd.requires-mounts-for=/overlay    0    0
    mount_over           /tmp        over    defaults,x-systemd.requires-mounts-for=/overlay    0    0
    /overlay/swapfile    swap        swap    pri=-1,x-systemd.requires-mounts-for=/overlay      0    0

    Change it to look like this:

    proc                 /proc       proc    defaults                                           0    0
    LABEL=thinux         /           ext4    defaults,rw,noatime                                0    1
    LABEL=data           /overlay    data    defaults,noatime                                   0    2
    #mount_over          /etc        over    defaults,x-systemd.requires-mounts-for=/overlay    0    0
    #mount_over          /var        over    defaults,x-systemd.requires-mounts-for=/overlay    0    0
    mount_over           /home       over    defaults,x-systemd.requires-mounts-for=/overlay    0    0
    mount_over           /tmp        over    defaults,x-systemd.requires-mounts-for=/overlay    0    0
    /overlay/swapfile    swap        swap    pri=-1,x-systemd.requires-mounts-for=/overlay      0    0

    So why do we use a read only root filesystem? More than 99% of our customers do not need to install new software on their computers. They use their computers as thin clients or cloud computers – which means they largely use the RDP client, or the web browser, to do their work. The pre-installed software such as LibreOffice are enough for them to get their work done. Now, instead of updating their computers using apt, which updates individual packages, we are able to upgrade their entire root file system in one shot, like a binary blob. This is similar to how other embedded operating systems such as Android or iOS update (except they have apps; we don’t). This allows us to test the updates we release very thoroughly on our own hardware, before we release it, and ensure that all changes and refreshed applications in the update work well with each other. We are also able to prevent the user’s computers from getting dysfunctional because an apt or dpkg upgrade was interrupted in the middle – our update system is able to gracefully handle abrupt poweroffs.

    Setting up Munin for thermal monitoring on Ubuntu

    $
    0
    0

    On the server:

    sudo apt -y install munin apache2 libapache2-mod-fcgid

    Enable the following settings in /etc/munin/munin.conf:

    graph_strategy cgi
    html_strategy cgi

    Enable the following settings in /etc/munin/apache24.conf:

    # Alias /munin /var/cache/munin/www
    ScriptAlias /munin /usr/lib/munin/cgi/munin-cgi-html

    Now run:

    sudo a2enconf munin
    sudo systemctl reload apache2

    Now enable munin-node on your clients:

    chroot /storage/spins/u20-x86/
    apt -y update
    apt -y upgrade
    apt -y install munin-node

    Add the following settings in /etc/munin/munin-node.conf:

    allow ^192\.168\.11\.1$

    Now add all your nodes to munin.conf:

    sudo su -
    cd /etc/munin
    for d in `seq 10 250` ; do echo -e "[$d.localdomain]\n  address 192.168.11.$d\n  use_node_name yes\n"; done >> munin.conf
    

    Best Mini PC Thinvent

    $
    0
    0

    Low Cost Thinvent Micro 5

    What makes Mini PCs best?

    A mini PC is a small and lightweight computer that is designed to be portable and easy to use. Mini PCs are typically smaller than traditional desktop computers and are often about the size of a small laptop or even a palm-sized device. These compact computers are a great option for those who need a powerful and versatile machine that can be easily carried around and used in a variety of different settings.

    Mini PCs are often used in a variety of settings, such as for home entertainment, as a media center, for office productivity, and more. Thinvent mini PCs are great since they offer a range of features and capabilities, including powerful processors, fast memory and storage, and a compact design that makes them easy to use and transport. Additionally, many mini PCs including Thinvent come with the option to upgrade or customize components such as memory and storage, allowing you to tailor your device to your specific needs.Ultimately, the best mini PC for you will depend on your specific needs and preferences.

    When it comes to mini PCs, there are a few key factors that can make a particular model stand out as the best. These include:

    Powerful performance: Mini PCs are often used for a variety of tasks, from office productivity to home entertainment. As such, it’s important that they offer strong performance in terms of both speed and reliability. This means choosing a mini PC with a powerful processor and enough memory and storage to handle your workload.

    Compact design: One of the main advantages of a mini PC is its small size, which makes it easy to transport and use in a variety of settings. The best mini PCs are designed to be as compact as possible, without sacrificing performance or features.

    Versatility: Mini PCs are often used in a range of different settings, from the home to the office. The best mini PCs offer a range of connectivity options and expandability features, allowing you to use them with a variety of peripherals and accessories.

    Value for money: Mini PCs are generally more affordable than traditional desktop computers, but that doesn’t mean you should settle for a low-quality model. The best mini PCs offer a good balance of performance, features, and price, giving you the most value for your money.


    Thinux Embedded Linux

    $
    0
    0

    Inside Thinux: Uncovering the Key Features for Enhanced Thin Client Computing

    #

    Thinux is a Thinvent’s Embedded Linux environment for client side devices. It converts an x86 (VIA, Atom) or ARM based thin client into a standalone computing device. This combines the ruggedness and cost effectiveness of thin client hardware with the versatility and performance of a PC.

    From cloud computing to Win32 binaries, we’ve made all kinds of business applications work on Thinux. Whether you are making a kiosk, a ticketing terminal, or interactive digital signage, Thinux can be adapted to meet your exact needs.

    Features

    • Factory reset functionality that removes any misconfiguration and allows the device to boot again.
    • Read only, compressed image. Footprint as low as 64MB.
    • Copy on write functionality permits on the fly changes to the file system.
    • All forms of connectivity – Ethernet, DSL, 3G, GPRS, Wi-Fi, VSAT and VPN.
    • Strong support for Indic localisation of applications and content.
    • Remote management and monitoring through the web browser. Just point your browser to the IP address of the device, to disable devices, upgrade firmware and applications, monitor CPU temperature, etc.
    • Preconfigured drivers for all manners of peripherals – biometric authentication, UPS control, smart card access, etc.
    • Highly customisable UI that prevents misuse and ensures easy maintenance. Colour swatches on the task bar enable easy over-the-phone debugging of common problems such as loss of connectivity or printer malfunction.
    • Support for disconnected working of server side applications. From J2EE apps to legacy terminal programs, we have ported all kinds of applications to run locally on the thin client in the case of a network failure. When connectivity is restored, the client and server data stores are synchronised in the background.

    Links

    Article 0

    $
    0
    0

    Streamline Business Operations with the Byte 1 Mini PC

    In today’s fast-paced business landscape, optimizing productivity and efficiency is essential for success. Enter the Byte 1 Mini PC—a compact yet powerful solution designed to transform your business operations. In this article, we’ll explore how the Byte 1 Mini PC can provide tangible value to your organization by enhancing productivity, streamlining workflows, and driving overall business growth. Discover the key benefits and practical applications that make the Byte 1 Mini PC an indispensable tool for businesses like yours.
    .

    Unmatched Performance for Enhanced Productivity

    The Byte 1 Mini PC is engineered to deliver unparalleled computing power, enabling your team to achieve peak performance. With its advanced Intel® Celeron® Processor N4120 and up to 16GB of DDR4 memory, multitasking becomes seamless, allowing your employees to work on multiple projects simultaneously. This increased efficiency translates into improved productivity, faster completion times, and ultimately, greater business output.

    Seamless Desktop Experience for Uninterrupted Workflow

    The Byte 1 Mini PC offers a smooth and intuitive desktop experience, ensuring uninterrupted workflow for your team. Powered by cutting-edge technology, this device provides lightning-fast processing speeds and responsive performance, minimizing downtime and maximizing productivity. Your employees can effortlessly navigate through tasks, access critical information, and collaborate seamlessly, ultimately driving efficiency throughout your organization.

    Enhanced Connectivity and Expandability for Effortless Integration

    With its wide range of connectivity options, the Byte 1 Mini PC seamlessly integrates into your existing business ecosystem. Equipped with HDMI, DP, USB 3.0, and Ethernet ports, this device enables effortless connectivity with peripherals such as monitors, printers, scanners, and more. By simplifying the integration process, the Byte 1 Mini PC reduces setup time and allows your team to focus on what matters most—getting work done.

    Robust Networking Capabilities for Reliable Performance

    Connectivity is the lifeblood of any modern business. The Byte 1 Mini PC is designed with robust networking capabilities, including a 1 Gbps Ethernet port and an Intel WiFi module. This ensures stable and secure connectivity, facilitating seamless access to cloud services, efficient data transfer, and smooth communication. Say goodbye to connectivity issues and embrace a reliable and streamlined networking experience.

    Enhanced Security Features for Data Protection

    Protecting your business data is of paramount importance. The Byte 1 Mini PC prioritizes security with advanced features, keeping your sensitive information safe from potential threats. With built-in security measures, including secure boot, encryption options, and data protection protocols, you can have peace of mind knowing that your valuable data remains secure and confidential.

    Tailored Support and Service for Hassle-Free Operations

    We understand that reliable support is crucial for your business. That’s why the Byte 1 Mini PC comes with various warranty and service options tailored to meet your specific needs. From standard return-to-bench warranties to extended coverage and on-site service availability in select locations, our dedicated support team is always ready to assist you, ensuring minimal disruptions to your operations.
    The Byte 1 Mini PC is more than just a compact computing device; it is a powerful tool that can transform your business operations. By leveraging its unmatched performance, seamless desktop experience, enhanced connectivity, and robust security features, you can unlock new levels of efficiency and productivity. Empower your team to focus on what truly matters—delivering exceptional results and driving your business forward. Experience the value that the Byte 1 Mini PC brings to your organization and embark on a journey of streamlined operations and accelerated success.

    Article 0

    $
    0
    0

    Mini PC Showdown: Exploring Thinvent Byte 1, Intel NUC 11 Essential, and Dell Optiplex 5000 for Business Computing

    In this comprehensive analysis, we will compare three leading mini PCs—Thinvent Byte 1, Intel NUC 11 Essential, and Dell Optiplex 5000—designed specifically for business computing. By examining their performance, design, connectivity options, security features, and support offerings, you can make an informed decision about the mini PC that best suits your business needs.

    1.Thinvent Byte 1: Efficiency and Space Optimization

    • Performance: The Intel® Celeron® Processor N4120 powers the Byte 1, ensuring smooth multitasking and enhanced productivity.
    • Compact Design: With its sleek powder-coated aluminum housing, the Byte 1 optimizes desk space without compromising functionality.
    • Comprehensive Connectivity: Versatile ports and connectivity options facilitate seamless integration with peripherals, enhancing collaboration and workflow efficiency.
    • Reliable Networking and Security: Ethernet and Wi-Fi connectivity, coupled with built-in security measures, provide stable networking and data protection.
    • Tailored Support and Service: Thinvent offers warranty options and reliable customer support, minimizing disruptions to business operations.


    2. Intel NUC 11 Essential: Power and Flexibility

    • Enhanced Processing Power: The NUC 11 Essential offers Intel Core i3, i5, or i7 processors, ensuring efficient handling of demanding tasks.
    • Compact Form Factor: Similar to the Byte 1, the NUC 11 Essential’s compact size optimizes workspace while maintaining a modern aesthetic.
    • Versatile Connectivity: Multiple connectivity options enable seamless integration with a range of peripherals and devices.
    • Reliable Networking Capabilities: Ethernet connectivity and optional wireless capabilities ensure stable connections and fast data transfer.
    • Advanced Security Features: Additional security measures such as TPM enhance data protection and mitigate potential risks.

    3. Dell Optiplex 5000: Performance and Reliability

    • Reliable Performance: Equipped with Intel Core i5 or i7 processors, the Optiplex 5000 delivers reliable performance for daily business operations.
    • Sleek Design: The Optiplex 5000 boasts a modern design that blends seamlessly with any office environment.
    • Extensive Connectivity Options: Versatile ports facilitate the connection of multiple displays, peripherals, and other devices, enhancing collaboration.
    • Advanced Security Features: Dell Optiplex 5000 incorporates robust security measures, including TPM and Dell Data Protection, to safeguard sensitive data.
    • Comprehensive Support and Service: Dell’s reputation for exceptional support and warranty options ensures prompt resolution of technical issues.
    By carefully evaluating the unique features and strengths of each mini PC, businesses can make an informed decision. The Thinvent Byte 1 excels in efficiency, compact design, and comprehensive connectivity. The Intel NUC 11 Essential offers power and flexibility, while the Dell Optiplex 5000 delivers performance, reliability, and advanced security features. Consider your specific business requirements and goals to choose the mini PC that best suits your organization’s needs, enabling seamless and productive business computing.

    Thin Client vs. Mini PC: Choosing the Right Computing Solution for Your Needs

    $
    0
    0

    Thin Client vs. Mini PC: Choosing the Right Computing Solution for Your Needs

    In the rapidly evolving world of technology, the need for efficient and cost-effective computing solutions has become increasingly important. Two popular options that have gained significant traction in recent years are thin clients and mini PCs. While both options offer their unique advantages, understanding their differences and applications is crucial to make an informed decision. In this blog post, we will explore the characteristics, benefits, and ideal use cases of thin clients and mini PCs, helping you choose the right computing solution for your specific needs.

    Thin Clients

    A thin client is a lightweight computing device designed to connect to a remote server or cloud infrastructure for most of its processing needs. Unlike traditional desktop PCs, thin clients typically have minimal local processing power, storage, and software capabilities. Instead, they rely on the centralised server to handle complex tasks and deliver the necessary resources to the client over a network connection.

    Benefits of Thin Clients:

    1.Cost-efficiency: Thin clients are generally less expensive to purchase and maintain than traditional PCs. Their minimal hardware requirements result in lower upfront costs, reduced power consumption, and easier management, making them an attractive choice for businesses looking to optimise their IT budgets.

    2.Enhanced security: Since the majority of the processing occurs on the server, thin clients are less vulnerable to security threats. Data remains centralised, reducing the risk of data loss or theft from individual devices. Additionally, software updates and patches can be applied centrally, ensuring consistent security measures across the network.

    3.Simplified management: With thin clients, IT administrators can streamline the deployment, maintenance, and software updates from a central server. This centralized management approach allows for easier scalability and reduces the time and effort required to manage individual devices.

    Ideal Use Cases for Thin Clients: Thin clients are well-suited for specific scenarios, including:

    1.Virtual desktop infrastructure (VDI): Thin clients excel in VDI environments, where a large number of users need to access a shared set of applications and resources. By offloading most processing tasks to the server, thin clients enable seamless access to virtual desktops, improving productivity and resource allocation.

    2.Task-oriented workplaces: Industries with task-oriented roles, such as call centres, retail operations, or manufacturing facilities, can benefit from thin clients. These devices provide a standardised interface for employees, ensuring uniformity and reducing the risk of data breaches or unauthorised software installations.

    3.Remote work environments: With the rise of remote work, thin clients offer a convenient solution. Employees can connect to the centralised server infrastructure from their own devices, ensuring data security and consistent software access regardless of their physical location.

    Mini PCs

    In contrast to thin clients, mini PCs are fully functioning computers packed into compact form factors. They possess their own processing power, storage, and operating systems, providing a more independent computing experience. Mini PCs often resemble small desktop towers or compact boxes, making them suitable for various computing needs.

    Benefits of Mini PCs:

    1.Local processing power: Mini PCs boast a higher level of processing power than thin clients, making them suitable for resource-intensive tasks. They can handle applications that require substantial computing resources, such as graphic design, video editing, or gaming.

    2.Flexibility and versatility: Mini PCs offer greater flexibility in terms of software installation and customization. Users have the freedom to choose their preferred operating systems, applications, and configurations according to their specific requirements.

    3.Portability: While not as compact as mobile devices, mini PCs are still highly portable compared to traditional desktop computers. They are ideal for individuals who need a portable computing solution without compromising on performance.

    Ideal Use Cases for Mini PCs: Mini PCs are well-suited for various scenarios, including:

    1.Home entertainment centres: Mini PCs can serve as media centres, streaming devices, or gaming consoles. Their compact size allows them to seamlessly integrate into home theatre setups, providing high-quality multimedia experiences.

    2.Small office/home office (SOHO) setups: Mini PCs are suitable for individuals or small businesses requiring a reliable yet space-efficient computing solution. They can handle common office tasks, multimedia needs, and even light-to-moderate creative work.

    3.Digital signage and kiosks: The small form factor and versatility of mini PCs make them an excellent choice for digital signage displays or interactive kiosks. These devices can deliver engaging content and provide interactive experiences while occupying minimal space.

    When deciding between thin clients and mini PCs, it’s essential to consider your specific computing requirements. Thin clients excel in centralised, task-oriented environments, where cost-efficiency, security, and simplified management are paramount. On the other hand, mini PCs provide greater processing power, flexibility, and portability, making them ideal for more independent and resource-intensive tasks. By understanding the unique benefits and ideal use cases of each option, you can choose the right computing solution that aligns with your needs and maximises efficiency in your personal or professional environment.

    Extending the Lifespan of Mini PCs: Top Tips and Tricks

    $
    0
    0

    Extending the Lifespan of Mini PCs: Top Tips and Tricks

    Mini PCs have gained immense popularity over the years due to their compact size, energy efficiency, and versatility. Whether used as media centers, home servers, or office workstations, these small computing powerhouses have proven their worth. However, like all electronic devices, mini PCs require proper care and maintenance to ensure a long and reliable lifespan. In this blog post, we will explore some effective ways to enhance the lifespan of your mini PC, ensuring you get the most out of your investment.

    1. Proper Ventilation and Cooling:

    Heat is the number one enemy of electronic components. Mini PCs, with their compact design, often have limited space for proper airflow. To enhance their lifespan, it’s essential to ensure adequate ventilation and cooling. Make sure the mini PC is placed on a flat, hard surface with enough clearance for air circulation. You can also use external cooling solutions such as small USB-powered fans or laptop cooling pads to keep temperatures in check.

    2 . Regular Dusting and Cleaning

    Dust accumulation can impede airflow and cause the components to overheat. Regularly dust off the exterior and interior of the mini PC using compressed air or a soft brush. Be cautious while cleaning to avoid any damage to delicate components.

    3 . Optimize Startup Programs:

    Unnecessary startup programs can slow down your mini PC and put unnecessary stress on its components. Optimize the startup programs to reduce the load on the system and enhance its overall performance.

    4 . Keep the Operating System Updated:

    Regularly update your operating system and drivers to ensure your mini PC runs smoothly and efficiently. Updates often include bug fixes and performance improvements that can contribute to a longer lifespan.

    5 . Use Reliable Power Supply:

    The power supply unit (PSU) is a critical component of any PC, including mini PCs. Ensure you use a high-quality and reliable PSU to protect your mini PC from voltage fluctuations and power surges, which can cause damage to its internal components.

    6 . Implement Proper Shutdown Procedures:

    Avoid turning off the mini PC abruptly by pulling the power plug or using the power switch. Always shut down the system using the appropriate shutdown procedure in the operating system. This helps prevent data corruption and extends the life of the storage drive.

    7 . Install Antivirus and Antimalware Software:

    Protect your mini PC from viruses, malware, and other malicious threats by installing reputable antivirus and antimalware software. Regular scans and real-time protection will keep your system safe and reduce the risk of damage caused by malware.

    8 . Backup Important Data:

    Always back up your essential data to an external storage device or a cloud-based service. In the event of a hardware failure or software issue, having a backup ensures your data remains safe and retrievable.

    9 . Avoid Overclocking:

    While overclocking can boost performance, it also increases power consumption and generates more heat. For the sake of longevity, it’s generally better to avoid overclocking mini PCs, as they are designed for optimized energy efficiency and may not handle sustained high performance.

    By following these tips and tricks, you can significantly extend the lifespan of your mini PC and enjoy its reliable performance for years to come. Proper care, maintenance, and sensible usage will not only save you from unnecessary expenses but also ensure a smooth computing experience throughout the mini PC’s life. Remember, a little effort in maintenance can go a long way in preserving the health of your miniature computing companion.

    Blog page

    $
    0
    0

    Best Mini PC Thinvent

    Best Mini PC ThinventLow Cost Thinvent Micro 5 What makes Mini PCs best? A mini PC is a small and lightweight computer that is designed to be portable and easy to use. Mini PCs are typically smaller than traditional desktop computers and are often...

    Setting up Munin for thermal monitoring on Ubuntu

    On the server: sudo apt -y install munin apache2 libapache2-mod-fcgid Enable the following settings in /etc/munin/munin.conf: graph_strategy cgi html_strategy cgi Enable the following settings in /etc/munin/apache24.conf: # Alias /munin...

    Making changes in Thinux

    Making Changes in Thinux  Our Neo and Micro range of products come pre-installed with our Thinux Embedded Linux operating system. Thinux is based on Ubuntu Linux. As of the writing of this article, it is based on Ubuntu 20.04.3 LTS in Micro 5 and (...

    Setup a CentOS armhfp VM on Ubuntu 18.04 Desktop

    Not long ago, I got a chance to set up the CentOS armhfp virtual machine on my Ubuntu 18.04 desktop for one of my projects. Although I could have chosen another way to do my testing which involves flashing the ARM image on an SD card and booting it...

    Setup a CentOS armhfp VM on Ubuntu 18.04 Desktop

    $
    0
    0

    Not long ago, I got a chance to set up the CentOS armhfp virtual machine on my Ubuntu 18.04 desktop for one of my projects. Although I could have chosen another way to do my testing which involves flashing the ARM image on an SD card and booting it on the board, I preferred to work on the QEMU. The reason is that the testing of boards like Cubietruck or Raspberry Pi is time-consuming. If somehow we corrupt the image, we would be following the same procedures all over again like removing the SD card, reflashing with the correct OS image and, booting/testing the pkg/update/, changing the U-boot settings, etc.

    QEMU is an open-source machine emulator or virtualizer which is capable to run operating systems of any architecture. To set up the QEMU environment in a base OS like Ubuntu or CentOS is pretty straightforward.

    Prerequsites

    Install the QEMU and other supporting packages to enable the QEMU in the Ubuntu 18.04 system.

    sudo apt-get update

    sudo apt-get install -y qemu-kvm qemu virt-manager virt-viewer libvirt-binYou can also download QEMU from the offcial site. To download and build QEMU 5.0.0:

    wget https://download.qemu.org/qemu-5.0.0.tar.xz
    tar xvJf qemu-5.0.0.tar.xz
    cd qemu-5.0.0
    ./configure
    make
    

    To download and build QEMU from git:

    git clone https://git.qemu.org/git/qemu.git
    cd qemu
    git submodule init
    git submodule update --recursive
    ./configure
    make
    

    Set up bridge networking in the system. A bridged network is a dedicated network card to a virtual machine that helps guest machines to connect outside the network, and this must be set up before creating a virtual machine using QEMU.

    sudo apt-get install -y bridge-utils resolvconf

    Edit interface file to create a bridge br1. You can also assign the static IP to your bridge.

    sudo nano /etc/network/interfaces

    # interfaces(5) file used by ifup(8) and ifdown(8)

    auto lo

    iface lo inet loopback

    #Bridge Name #
    auto br1

    # Bridge Information #
    iface br1 inet static
    bridge_ports ens33
    bridge_stp off
    bridge_fd 9
    # Bridge IP #
    address 192.168.1.10
    netmask 255.255.255.0
    network 192.168.1.0
    broadcast 192.168.1.255
    gateway 192.168.1.1
    dns-nameservers 192.168.1.1
    dns-nameservers 8.8.8.8

    Download the CentOS ARM image

    Download or import the ARM image. Here we are using the CentOS ARM image. You can download it from the CentOS page or wget/curl it from the CEntOS FTP server. You can download the image directly from the link below.

    Or you can wget the image from the command line.

    wget http://centos.zero.com.ar/centos-altarch/7.8.2003/isos/armhfp/CentOS-Userland-7-armv7hl-generic-Minimal-2003-sda.raw.xz

    Running the QEMU

    QEMU would require Kernel and initramfs file for booting the image. You can extract these files by mounting the image using the kpartx and mount command.

    Using kpartx:

    sudo kpartx -av (path_of_your_image)

    Running the above command will create the loop devices in your system. You can mount the particular loop device to mnt using the mount command and copy the required files from the image.

    sudo mount /dev/mapper/loop21p2 /mnt/

    Once you are done with your changes, you need to umount the mnt and delete the loops.

    sudo umount /mnt/

    sudo kpart -dv (path_of_the_image)

    Using mount command:

    Use parted command to get the start and end sector of the partitions in the image.

    sudo parted (path_of_the_image)

    Running the above command will open the parted utility. Type Unitand press enter. Enter the option b. Once it is done, type print and you will get the required information.

    Use this information to mount the required partition to the mnt. Here I am mounting the first partition to the mnt.

    sudo mount -o loop,offset=4194304 (image_path) /mnt/

    Since we have extracted the required files from the image, you can now use the QEMU command to run the VM environment.

    qemu-system-arm \

    -M cubieboard -m 2048 -cpu arm1176 -dtb sun4i-a10-cubieboard.dtb \

    -kernel vmlinuz-4.19.113-300.el7.armv7hl \

    -append "ro root=UUID=64e0ba9f-b645-4ce1-925d-e1a723a580fd rhgb quiet LANG=en_US.UTF-8" \

    -initrd initramfs-4.19.113-300.el7.armv7hl.img -nographic \

    -drive file=(Image_file_path),format=raw,if=none,id=d1 \

    -device ide-hd,drive=d1 -net user,hostfwd=tcp::10022-:22 -net nic

    Here I have provided 2GB RAM to the VM and provided the other pieces of information which are required to boot the image like kernel, initrd etc.

    Once the image is successfully booted, you will get the login screen at your terminal.

    By default, the size of the root file system partition is limited to 2 GB. The size of the partition can be increased by the following command.

    [root@host ~]# /usr/bin/rootfs-expand


    The All-In-One (AIO) Computer: Your Gateway to Streamlined Efficiency and Space-Saving Elegance

    $
    0
    0

    The All-In-One (AIO) Computer: Your Gateway to Streamlined Efficiency and Space-Saving Elegance

    In the dynamic realm of personal computing, the All-In-One (AIO) computer has emerged as a compelling solution that marries performance, style, and space-saving convenience. These multifunctional machines have gained immense popularity due to their ability to cater to diverse computing needs while optimizing your workspace. In this article, we delve into the world of AIO computers and explore their many advantages.

    AIO Computers: The Definition of Versatility

    At its core, an AIO computer encapsulates the essence of versatility. It combines the central processing unit (CPU), monitor, and other essential components into a single, sleek unit. This integration eliminates the need for bulky desktop towers and a myriad of cables, offering a clean and clutter-free workspace.

    Streamlined Space Utilization

    For those working in compact office spaces or desiring a minimalist aesthetic, AIO computers are a game-changer. Their compact footprint allows them to fit seamlessly into even the most confined spaces, liberating your desk from the tangle of wires and unsightly hardware. This elegant design is an embodiment of modern computing solutions.

    Performance Prowess

    Don’t be fooled by their slender appearance; AIO computers pack a punch when it comes to performance. Many models offer powerful processors, ample RAM, and excellent graphics capabilities. Whether you’re a professional engaging in resource-intensive tasks or a gamer seeking immersive experiences, AIO computers can deliver the performance you need.

    Stunning Displays

    The visual aspect of AIO computers is equally impressive. Most models come equipped with high-resolution displays that offer vibrant colors and sharp details. Whether you’re editing photos, watching movies, or working on spreadsheets, the quality of the display enhances your overall computing experience.

    Connectivity Made Easy

    AIO computers are designed with user convenience in mind. They offer a range of connectivity options, including USB ports, HDMI, and audio jacks. This versatility ensures that you can connect all your peripherals and accessories without hassle.

    AIO Computers for Work and Play

    These multifunctional machines are equally adept at handling business tasks and leisure activities. Whether you need a reliable workstation for productivity or a hub for streaming and gaming, AIO computers seamlessly adapt to your requirements.

    Space-Saving at Home

    For home users, AIO computers offer a fantastic solution. They’re ideal for family spaces, bedrooms, or kitchens, where aesthetics and space are paramount. With an AIO, you get the computing power you need without compromising on the overall ambiance of your living spaces.

    Customization and Upgradability

    Contrary to the misconception that AIO computers lack upgradability, many models offer options for hardware expansion and upgrades. This means you can adapt your AIO to evolving needs by adding more RAM, upgrading storage, or even enhancing graphics capabilities.

    Energy Efficiency

    AIO computers are also known for their energy efficiency. They typically consume less power than traditional desktop setups, contributing to lower energy bills and a reduced carbon footprint.

    Choosing the Right AIO

    Selecting the perfect AIO computer for your needs involves considering factors such as processing power, display size, storage options, and operating system compatibility. Whether you prioritize productivity, entertainment, or a blend of both, there’s likely an AIO model that aligns with your preferences.

    AIOs Now Available at Thinvent

    If you’re intrigued by the versatility and elegance of AIO computers, you’ll be delighted to know that AIOs are now available at Thinvent. Check out the datasheet with detailed information. 

    ARE MINI PCs WORTH IT?

    $
    0
    0

    Are Mini PCs Worth It?

    What Are Mini PCs?

    At first glance, Mini PCs may appear unassuming due to their compact size, but don’t let that fool you. These small form-factor computers pack a surprising punch. A Mini PC is essentially a fully functional computer condensed into a compact chassis. Despite their diminutive dimensions, they offer all the capabilities of traditional desktop computers, albeit with some trade-offs.

    Are Mini PCs worth it? The answer depends on your specific needs and priorities. If you value space efficiency, energy savings, and portability, Mini PCs can be an excellent choice. While they may have limitations, resourceful users have found creative ways to work around them and continue to find Mini PCs worthwhile.

    Lets understand in detail:

    The Advantages of Mini PCs

    1. Space Efficiency

    One of the most compelling reasons to consider a Mini PC is its space-saving design. These small form-factor computers are perfect for situations where desk space is at a premium. Whether you have a cozy home office or limited room in your dormitory, Mini PCs can seamlessly integrate into your workspace. Imagine reclaiming that cluttered desk space for other essential items or simply enjoying a cleaner, more organized environment.


    1. Energy Efficiency

    Mini PCs are renowned for their energy efficiency. They consume significantly less power compared to traditional desktop towers. Over time, this can translate into noticeable savings on your electricity bill. Moreover, opting for a Mini PC aligns with eco-conscious computing. Reducing power consumption not only benefits your wallet but also reduces your carbon footprint, contributing to a more sustainable future.

    1. Portability and Flexibility

    Mini PCs are incredibly portable. Their compact size and lightweight build make them suitable for on-the-go computing. If your work or hobbies frequently take you outside your home or office, a Mini PC can serve as your reliable companion. Whether you need a powerful tool for presentations, a versatile workstation for remote work, or a portable media center for entertainment, Mini PCs offer the flexibility to adapt to various scenarios.

    4. Versatility in Applications

    These miniature marvels aren’t limited to a single role. They can perform various tasks, from everyday office work to multimedia entertainment, digital signage, and even serving as dedicated home servers. The versatility of Mini PCs makes them adaptable to a wide range of use cases. Need a low-profile computer for your digital signage project? A Mini PC fits the bill. Looking for a compact media center PC to stream your favorite shows? A Mini PC has you covered. The possibilities are extensive.

    Considerations for Mini PCs

    1. Performance

    While Mini PCs offer many advantages, they may not be the ideal choice for tasks that demand high-performance computing. Resource-intensive applications like video editing, 3D rendering, or gaming may strain the capabilities of a typical Mini PC. It’s crucial to align your expectations with the intended usage. If you’re a professional video editor or a hardcore gamer, you might find a traditional desktop or a gaming laptop better suited to your needs. However, for everyday computing tasks, web browsing, document editing, and media consumption, Mini PCs provide ample processing power.

    1. Connectivity Constraints

    Mini PCs tend to have fewer ports and connectivity options compared to traditional desktops. If you require a wide array of peripherals, such as multiple monitors, external drives, or specialized input devices, you may need to invest in additional adapters or choose a Mini PC model with suitable connectivity. It’s important to assess your connectivity needs and ensure that your Mini PC can accommodate them. Adapters and hubs are readily available to expand the port options if necessary.

    3. Limited Upgradability

    Due to their compact form factor, Mini PCs often have limited upgradability. Components like RAM and storage may not be easily replaceable or upgradeable. Consider your future needs when selecting a Mini PC to avoid potential limitations down the road. If you foresee the need for more storage or additional memory in the future, it’s wise to choose a Mini PC model that allows for some level of component upgrade or expansion. Some Mini PCs feature accessible RAM and storage slots, but not all do, so research the specific model carefully.

    So, are Mini PCs worth it? The answer hinges on your specific requirements and priorities. If you value space efficiency, energy savings, and portability, Mini PCs can be a fantastic choice for everyday computing needs. They shine in scenarios where desk space is limited, power efficiency is essential, or you need a computing solution on the go. Mini PCs also excel as dedicated media centers, home servers, and digital signage solutions.

    However, it’s vital to recognize the limitations of Mini PCs. They may not be the best choice for tasks that demand high-performance computing, extensive connectivity, or upgradability. If you’re a professional designer, a gamer, or have specialized computing needs, you may need to explore other options.

    To determine whether a Mini PC is worth it for you, carefully evaluate your computing needs, budget, and intended use cases. Explore the available Mini PC models, their specifications, and any potential limitations. By making an informed decision, you can ensure that a Mini PC aligns with your unique computing requirements.

    Empowering Your Digital World

    In the evolving landscape of computing, Mini PCs have emerged as transformative solutions, offering a harmonious blend of power, efficiency, and versatility. As we explored the realm of Mini PCs and the considerations that surround them, it becomes evident that making an informed choice is pivotal.

    At this juncture, it’s essential to introduce Neo 5, our flagship Mini PC solution designed with your evolving needs in mind. Neo 5 embodies the culmination of cutting-edge technology, sleek design, and unparalleled performance. It goes beyond the conventional, redefining what a Mini PC can be.

    Why Neo 5 Stands Out:

    Exceptional Performance

    Neo 5 is engineered to deliver lightning-fast processing and exceptional graphics, ensuring a seamless experience for every task, from work to entertainment.

    Innovative Design

    Its sleek, space-efficient design harmonizes functionality with aesthetics, making it a standout addition to any workspace.

    Advanced Connectivity

    Neo 5 offers an array of ports and expandable storage options, adapting to your connectivity needs and ensuring ample space for your files.

    Whisper-Quiet Operation

    Experience distraction-free computing with Neo 5’s efficient cooling system, providing optimal performance without noise disturbances.

    Tailored to Your Lifestyle

    Whether you’re a professional, a student, or an entertainment enthusiast, Neo 5 is tailored to empower your digital lifestyle, offering unmatched flexibility and reliability.

    Neo 5 isn’t just a Mini PC; it’s a commitment to a seamless, efficient, and enjoyable computing experience. Embrace Neo 5, where innovation meets convenience, and take a significant step toward enhancing your digital world.

    For more details about Neo 5 and to explore how it can transform your computing journey, please visit our website or reach out to our dedicated team. Your next level of computing awaits.

    Ultimately, the worthiness of a Mini PC lies in its ability to meet your needs while providing the advantages of a space-efficient, energy-saving, and versatile computing solution. Whether you’re looking to optimize your workspace, reduce energy consumption, or enjoy the freedom of a portable computing companion, Mini PCs offer a world of possibilities in a compact package.

    Viewing all 97 articles
    Browse latest View live